
Plugin Configuration
This feature is part of the Visforms Subscription and not available in the free Visforms version..
This is legacy documentation for old versions of the plugin as shipped with Visforms Subscription prior to version 3.2.2. In newer versions, option depending mail recipients are configured directly in form fields with option lists.
We suggest reading the documentation from the beginning, starting with the Introduction. We will not repeat explanations that help you to better understand the whole context.
Create a control field in your form
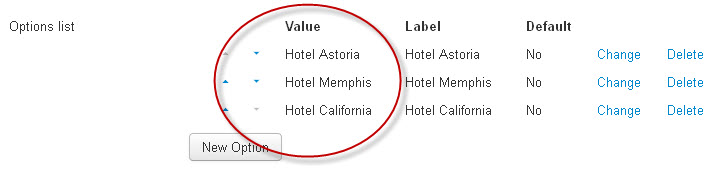
Create a field of type select, radio or checkbox group in your form and create options for this field. Each option will then be linked to a specific email address.
Please note down the option values (see screenshot), the field id and the form id, you need this information to set up the plugin.
Setting Up Custom Mail Addresses
User inputs in form and custom mail addresses are connected in the plugins configuration in the plugin manager.
Go to the Administration Panel of your Joomla! installation and click the top menu item "Extensions" and then "Plugin Manager". Search for the list item with the name "Visforms - Custom Mail Address". You can use the search filter above the list. Open the plugin "edit" view.
The plugin configuration - conneting user inputs with email addresses - is achived by adding an option string into the plugin parameter "Configuration string". The string links options of the control field, which you have created (and noted) in your form, to email addresses.
Example Configuration String
{
"1": {"fid": "4", "id":"85", "value":"Hotel Astoria", "mail":"
"2":{"fid":"4", "id":"85", "value":"Hotel Memphis", "mail":"
"3": {"fid": "4", "id":"85", "value":"Hotel California", "mail":"
}
Structure
Enclose the string in curled brackets {}.
Create a "record set" for each value of the control field. In the example above each "record set" is noted in a single line.
Each "record set" has to begin with a unique id (integer), which is enclosed in double quotes "and which is followed bei a colon :. After the colon you enter the assignment information (see below) which is enclosed in curled brackets {} again. Separate "record sets" with a comma. Please make sure, that you omit the comma after the last "record set". You can add as many assignment record sets as you like.
The assignment information consist of 4 "name":"value" pairs. Please make sure, you do not misspell names or values! Misspelling is the most common reason why the plugin looks as if it would not work properly. The names are constant. You only have to change the values.
fid: Form id. Can be retrieved from form list view in Visforms administration (last column). You can use the plugin to set custom mail addresses for different forms.
id: Field Id (of control field). You can retrieve the field id from the field list in the Visforms administration (last column).
Form and field id are also available in the field edit view.
value: User input, that triggers the custom mail address.These are the "values" of the option list (see screenshot above) which you have noted. IMPORTANT: You have to disable multi selection for selects and checkbox groups in order for this plugin to work properly.
mail: The email addresse, the result mail is send to, if a user choose this option in the form.
adrtype: Additional plugin option. Use this option if you want to adds mailcc or mailbcc addresses. If the option is not set, the plugin will work on the mailto address. Option values are "mailcc" or "mailbcc".
Avoid blanks in the option string, except for the values, enclosed in double quotes.
It's important that you really use double quotes "!
How it works
If the submitted user input matches a condition defined in the plugin option string, the plugin adds the respective mail address to the mailer. If you have set a mailto address in the form configuration, the mail will be sent to both mail addresses. If you want to mail the form only to the mail addresses set by the plugin you have to leave the mailto address option in the form empty and make sure that you have set a custon mail address for each condition of the control field. This assertion applies to mailcc and mailbcc equally.
If there is no mail address selected (for example because you have not set a mail address in the form configuration and you have forgotten to define custom mail addresses for each option of the control field) the mailer falls back to the Joomla! default settings (Menu System ->global configuration -> Tab "System").